Showing posts with label casual cosplay. Show all posts

Saturday, March 25, 2017

Rand al'Thor, the Dragon, shirt


My favorite book series is The Wheel of Time, written by Robert Jordan, and finished by Brandon Sanderson.  The world, the characters, the magic, all are amazingly well-developed and fascinating.  It's truly epic in scope, as well as its themes.

The main character is Rand al'Thor, who begins as a shepherd, but in true fantasy fashion, winds up as a king.  I've been wanting to do a casual cosplay outfit for Rand since I saw this awesome red shirt at Goodwill.


I had recently done an iron-on (and as I go to link to it, I realize I haven't posted it yet.... it'll be coming soon) and I was surprised how easy it was to work with an iron-on sheet.  I thought it would be the best way to get some regal looking designs and dragons onto this shirt.  So I went to Joann and bought the Tulip gold Metallics sheet for less than $5.


The first thing I did was print out the dragon chapter icon used in The Wheel of Time onto cardstock.


I painstakingly cut it out.


Then I traced it onto the back of the gold sheet.


And painstakingly cut it out.


I actually did this twice, with a dragon facing left and a dragon facing right.  Next, I needed the kingly embellishment.  I looked at an official source for that:
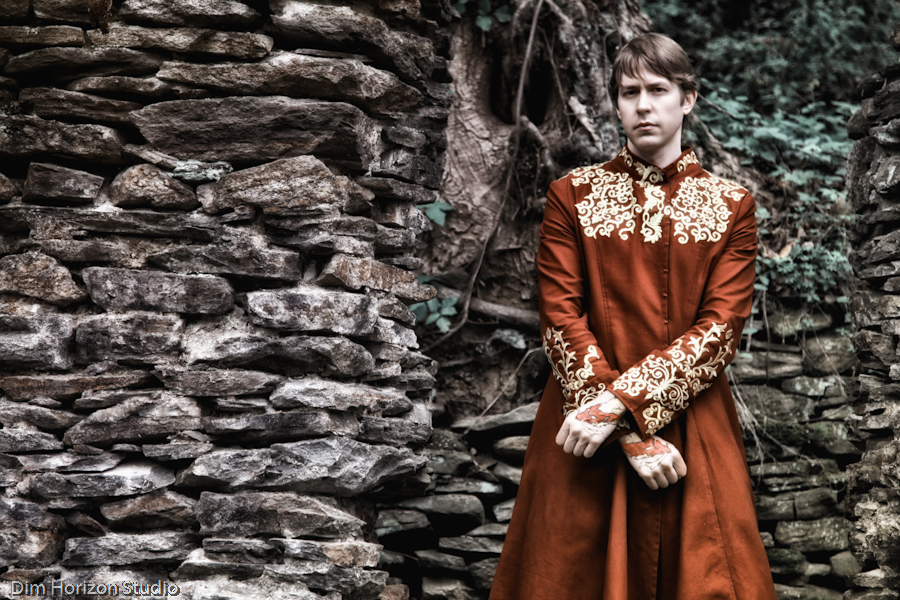
Paul Bielaczyc's Rand al'Thor costume
Paul's costume has a bunch of swirls that decorate the top and sleeves.  Well, I had to put the dragons on my sleeves, so I wanted to add the swirls just to the neckline.  I copied the top part of one of Paul's swirls, then made a smaller, less fancy swirl for filler.


I cut them out on cardstock and traced them onto the back of the gold sheet.


After I got them all cut out, I toyed with the layout.  Eventually, I decided on this.


This iron-on stuff is SO simple!  Place face up on the fabric,


Cover with a cotton cloth (or other piece of fabric),


And iron for 40 seconds.


Repeat with all the remaining pieces and you get this:


Next, I ironed on the dragons, making sure they faced the front.


I paired the finished shirt with this adorable gold crown (once again, he's a king!) that I bought at Charlotte Russe for $6.


Then I wore it to school the next day!


I am so in love with it!


~Buttons

Friday, February 24, 2017

Victor Nikiforov Flower Crown and Shirt

I'm crazy for the anime Yuri on Ice.  As I've probably said a million times already.  My love for this show--and so many of the characters--has no bounds.

Recently, I'm trying to get into causal cosplay.  It's a great way to relieve stress and anxiety at work.  A simple reminder that I'm in an outfit inspired by a show/book/movie I like does wonders for my mental health.

A few weeks ago, I accidentally got a stain on a cream colored shirt.  Since the shirt was ruined anyway, I had an idea to morph it into a Victor Nikiforov casual cosplay design.


Victor wears this outfit at a competition and it's beautiful!  I wanted to try to use this as inspiration for a casual shirt that I could wear to work.


I have experimented with using gel glue with bleach to get a design on a shirt, so I researched to see if it was possible with dying too.  In theory, it works.  So I took my white shirt, and used gel glue to etch out "feather" like shapes along the front of the shirt, sloping down to the left armpit.


At the top left, I did the inverse: I colored in the diamonds to remain white and left the connecting sections open to be dyed.


I used "denim blue" dye because it was what I had on hand.


You can see how the gel glue is holding strong!

The color looked so dark, so I freaked out and pulled it from soaking after ten minutes.  I bet the color would have turned out a lot brighter if I'd pushed through that fear and just trusted the package directions.

Now, with my adorable shirt ready, I HAD to have Victor's flower crown, or something similar.

I used blue clay to craft seven tiny roses.  I followed a tutorial on Pinterest, but my flowers still turned out kinda crappy. 


They were too big to turn into a necklace, so I figured a headband would hold them pretty well.  I hot glued them to a blue headband, and then added white beads in between.


And here's the final result:


I paired it with two bracelets: one blue and white snowflakes to represent Victor's Russian snow.  The second was a blue piglet--of course to represent Victor's love for his kobuta-chan, Katsuki Yuri!


~Buttons

Sunday, May 29, 2016

Lazy Maxi Skirt

I'm going to show the easiest, laziest way to make a maxi skirt.  I call it the "I don't give a f*** maxi skirt."  It's for those emergencies when you need the skirt so fast that you're willing to cut corners to see it done.  Of course, you can always go back at a later time and put a little more effort into it.  Or, just continue being lazy and keep it as is.

Materials:
1 yard of knit
Thread
Scissors
Sewing machine
Elastic


Step 1: Fold your material in half hot dog style.


Step 2: Stitch up the long side.  (I used a long zig-zag because that was what I saw suggested for working with knits.)

Step 3: Fold down the top hem about an inch and sew, leaving a two inch opening for inserting the elastic.

Step 4: Thread elastic into the top opening, sew it to itself, stitch the hole the rest of the way.


Step 5: Use scissors to trip the bottom of the skirt to the correct length.

And that's it!  This required two straight seams (along the side and the top hem), and the few short stitches when sewing the elastic to itself.  This is the easiest project imaginable!  It took me about ten minutes.

Now, the down side.  Apparently knits aren't great at bunching.  The extra fabric at the top--since I didn't measure my waist and trim accordingly--doesn't separate on its own.   You need to manually get the gathered parts to spread out along the elastic.  This isn't a big deal to me since I typically wear long shirts that don't show anywhere near the top waistband.

But, I got the job done in time to wear it to a performance that night.  It all worked out in the end.


I case you can't tell, this is an outfit I've assembled for casual cosplay.  It's fashioned after Chihiro from the Miyazaki anime "Spirited Away."


~Buttons