Showing posts with label easy craft. Show all posts

Saturday, March 25, 2017

Custom Iron-On Designs

I've had an idea for doing an iron-on project since I saw this shirt at the mall.
 

My dachshund's name is Friday--named after the Cary Grant film His Girl Friday, not the day of the week--and I somehow resisted buying this.  I still regret it to this day!

So, Pockets and I got together to do some iron-on crafts.

I wanted nice, big letters like in the original shirt, but couldn't find any that looked decent.  I wound up with tiny letters.  Also, I wanted to have a dachshund on the shirt.  Of course, no dachshund iron-on patches.  Ugh.

Finally, I decided to make my own dachshund patch.  I bought one of the iron-on sheets, which are amazing for custom work!  I found a picture of a long-haired dachshund and drew it onto the back of the sheet.  (I went with a chevron design because it was the cutest they had available.... The selection was not that great.)


Next, I played with the layout.


I finally settled on this one.


Then I used the left over sheet to cut out two hearts for the sleeves.


~Buttons

Rand al'Thor, the Dragon, shirt


My favorite book series is The Wheel of Time, written by Robert Jordan, and finished by Brandon Sanderson.  The world, the characters, the magic, all are amazingly well-developed and fascinating.  It's truly epic in scope, as well as its themes.

The main character is Rand al'Thor, who begins as a shepherd, but in true fantasy fashion, winds up as a king.  I've been wanting to do a casual cosplay outfit for Rand since I saw this awesome red shirt at Goodwill.


I had recently done an iron-on (and as I go to link to it, I realize I haven't posted it yet.... it'll be coming soon) and I was surprised how easy it was to work with an iron-on sheet.  I thought it would be the best way to get some regal looking designs and dragons onto this shirt.  So I went to Joann and bought the Tulip gold Metallics sheet for less than $5.


The first thing I did was print out the dragon chapter icon used in The Wheel of Time onto cardstock.


I painstakingly cut it out.


Then I traced it onto the back of the gold sheet.


And painstakingly cut it out.


I actually did this twice, with a dragon facing left and a dragon facing right.  Next, I needed the kingly embellishment.  I looked at an official source for that:

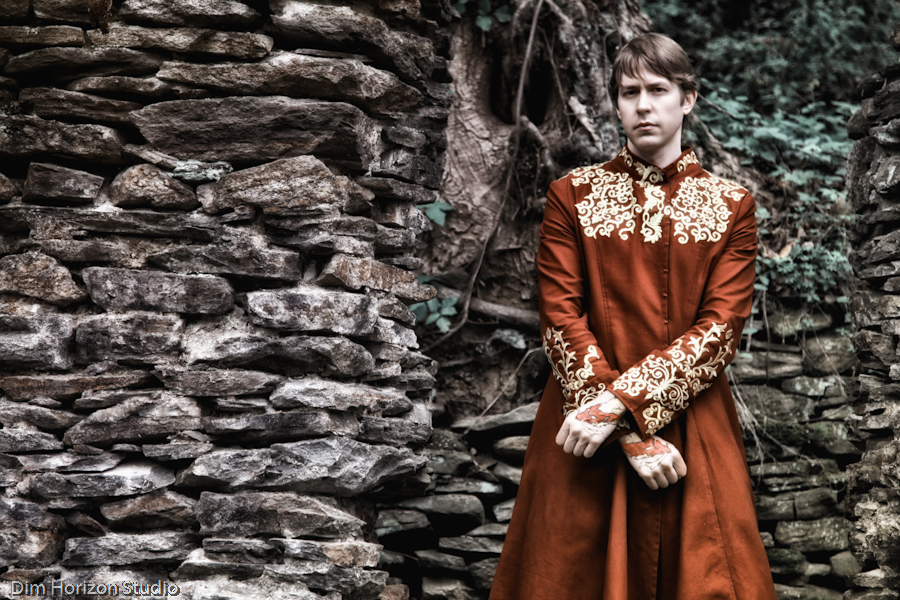
Paul Bielaczyc's Rand al'Thor costume
Paul's costume has a bunch of swirls that decorate the top and sleeves.  Well, I had to put the dragons on my sleeves, so I wanted to add the swirls just to the neckline.  I copied the top part of one of Paul's swirls, then made a smaller, less fancy swirl for filler.


I cut them out on cardstock and traced them onto the back of the gold sheet.


After I got them all cut out, I toyed with the layout.  Eventually, I decided on this.


This iron-on stuff is SO simple!  Place face up on the fabric,


Cover with a cotton cloth (or other piece of fabric),


And iron for 40 seconds.


Repeat with all the remaining pieces and you get this:


Next, I ironed on the dragons, making sure they faced the front.


I paired the finished shirt with this adorable gold crown (once again, he's a king!) that I bought at Charlotte Russe for $6.


Then I wore it to school the next day!


I am so in love with it!


~Buttons

Sunday, February 19, 2017

Milk Pocket Skirt

A few weeks ago I discovered a new fabric store called Bolts and More.  (It's right next to one of my favorite restaurants: New Mexican Grill.)

Anyway, I was delighted to see a new fabric store, so I eagerly went inside to explore.  They had an amazingly beautiful selection.  Of course, most were way out of my price range.  Still, I found a fat quarter in this pattern and nearly flipped:


I loved it so much!  But fat quarters were all I could afford at the time, so I envisioned a bulky brown skirt with milk bottle pockets.

Fast forward to last weekend.  While at Goodwill looking for some casual cosplay accessories, I found two perfect brown pillowcases ($0.99 for both!) and knew they were exactly what I needed to complete my bulky brown skirt with milk pockets.


I cut off both ends of the pillowcases, which gave me about a yard of fabric!  Not bad for $0.99!


I kept the width at the bottom and trimmed each top to half my waist measurement plus an inch seam allowance.


I sewed the pieces together, right side to right side.  Then I sewed up the bottom and top hems, and added an elastic band for the waist.

I cut my milk fat quarters into long rectangles and sewed them vertically onto the skirt.


I love this skirt!  It so comfy and beautiful!  Apparently it also makes me look like a pre-school teacher.  *LOL*


~Buttons

Thursday, December 22, 2016

Phichit Chulanont Hamster Hats

The season finale of Yuri on Ice left me with many different emotions: happiness, contentedness, a bit of disappointment, hope for the next level.  But above all others: inspiration!

There is so much about this show that is praiseworthy.  The plot (and plot twists), the animation, the relateable characters, the healthy relationships.  This anime was a powerhouse from start to finish.  It's been a long time since something struck me so deeply.

In the finale, we got a peek into many of the skaters' minds as they performed.  I think I speak for the entire fandom when I say how sweet and perfect Phichit's inner monologue was.  He's such a bright ray of sunshine.  Optimistic.  Confident.  A skilled skater with a ton of potential.  I think the world needs more Phichits to brighten up the day!  His dream of having a skate show because he wants "everyone in Thailand to know how fun figure skating is" can't get anymore beautiful!

And those costumes!  So over the top!  I adore everything about that idea, and would love to see this in an OVA!

Moving on.  Phichit's imagination made me start thinking about the adorable hamster hats, and how easy they would be to make.  Of course, my version goes for ease over 100% correctness, so there are a few modifications from the ones the skaters wear in the ice show.


First, I started out with this template.  I've used it several times for many projects and love how functional and customizable it is.


I traced it onto a bronzeish-brown fleece fabric.


Then I cut two white rectangles for the cheeks of the hamster.


Next, I cut out two rounded pieces in brown for the ears.


They need to be folded over like this.


Then I added a white part in the center.


I used a blanket stitch to put them together.


I sandwiched the ears in between the two brown hat pieces and sewed both sides of the seam.


After that, I stitched shut the V on the top.


Next, I sewed the white rectangles together, right side to right side, along both short edges to form a band.


 I folded the band in half then sewed it to the brown part, right side to right side.


Since the hats are small (and my head is tiny), I folded the brim up.  This gave it a cuter, fluffier look.


Next, I got a piece of white fleece and sewed a line down the middle for teeth.


I cut out a nose and two eyes (and two white eye shimmers).


To save time and energy, I used a hot glue gun to attached all the added details.


And it's finished!  It took me about an hour!