Pockets and I both enjoy gaming. Most of the time, the games we like differ greatly. However, there's one that we both have a passion for: Pikmin. We aren't hardcore gamers, just recreational gamers, and we both agree that the first Pikmin (originally released on the GameCube) is too hard and scary. I barely remember playing Pikmin 2 (also on the GameCube). But, when I got my Wii U for Christmas, I just had to try Pikmin 3.
Needless to say, I fell in love with the game. The controls are so simple, the storyline is interesting, the characters fun, and the Pikmin adorable! There isn't a single thing I dislike about the game. And this rekindled my love for the Pikmin franchise--so much so that I bought 1 and 2 on the Wii to give them another try; I am immensely enjoying 2 at the moment.
On to the point. This past Friday, the
Play Nintendo Tour came to a local mall. To celebrate this, and to be a total nerd, I thought it would be a good idea to make fleece Pikmin hats. It took some thought, but in the end, they weren't too difficult to put together. In fact, they were quite easy!
So here's a list of materials you'll need:
Roughly 1/3 yard of fleece in the color of your Pikmin
Green fleece
Batting or poly-fil
Hat pattern (I got mine
here)
The green fleece is for the leaf at the end of their stem. If you want to do a bud, you'll need white/pink/purple (depending on which Pikmin color you choose) and green. If you want a flower, you'll need white/pink/purple and yellow. Also, for the flower--and I'll mention this later--you may need an adhesive fabric.
The first thing to do is decide which color Pikmin you want. Each has different traits that you can embellish on your hat:
Red has a pointy nose
Blue has a pink mouth
Yellow has big years
Rock has jagged edges
Pink has wings
Purple has feelers
White has red eyes (I didn't include eyes on any of the others, but since it's what distinguishes the Whites, I would include it on this one)
So far, I've completed 5 of the 7--with plans to finish the other 2 this week.
This will go step by step with how I created the hats. I won't divide it by color, rather, I'll show the different ways to add the embellishments as we go along.
Step 1: Pattern
I searched endlessly on Pinterest until I found a pattern that would work for my purposes. I mentioned it in the list of materials, but I'll post it again. It's called the
Halloween Hat Pack from FleeceFun.com. This site has a wonderful video tutorial which really helped when I was attaching the stem. They also have a free pattern you can print off, in many different sizes.
I printed off the large adult, even though my head is tiny. I figured I could always take the material in if necessary.
So, print out the pattern and pin it to the color of fleece you're using. You'll want to have it folded, so you cut out two pieces at once--a front and a back.
 With your two pieces together, right side to right side, sew up each side to the top V.
 (You can see here I wanted to add a brim to the Blue Pikmin hat. So I cut off the bottom inch and sewed it back on.)
Set this part aside for the moment. We'll come back to it later.
Step 2: Make the Stem
This part can get a bit tricky, depending on how much effort you want to put forth. Making a stem with a leaf was incredibly easy. However, for variety, I wanted to make a bud and a flower (because we all know that flower Pikmin are the best!).
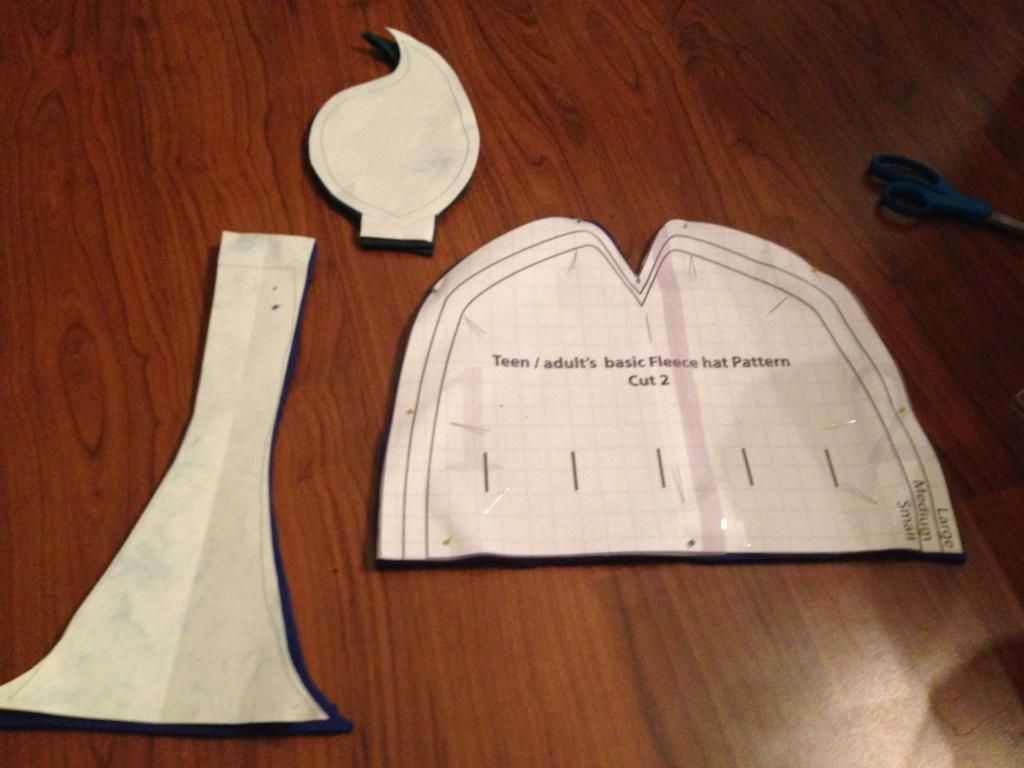
But first, we need to make a pattern for the stem. I drew this freehand on a piece of paper, making sure I made it as long as I needed, in relation to the hat I had already cut out.
(You can see here I wanted to add a brim to the Blue Pikmin hat. So I cut off the bottom inch and sewed it back on.)
Set this part aside for the moment. We'll come back to it later.
Step 2: Make the Stem
This part can get a bit tricky, depending on how much effort you want to put forth. Making a stem with a leaf was incredibly easy. However, for variety, I wanted to make a bud and a flower (because we all know that flower Pikmin are the best!).
But first, we need to make a pattern for the stem. I drew this freehand on a piece of paper, making sure I made it as long as I needed, in relation to the hat I had already cut out.
 I don't think it needed to be so wide at the bottom, but it didn't hinder the design either.
So, put the pattern on your fabric (again, we want to have two layers for a front and a back). Pin it and cut it out.
Do the same thing for a leaf, keeping the size consistant with all the other parts. Cut out a front and a back as well.
I don't think it needed to be so wide at the bottom, but it didn't hinder the design either.
So, put the pattern on your fabric (again, we want to have two layers for a front and a back). Pin it and cut it out.
Do the same thing for a leaf, keeping the size consistant with all the other parts. Cut out a front and a back as well.

 To make a front and a back, we want our fabrics to be mirror images of each other. So take one stem and place the leaf on top. Take the other stem, and make the leaf a mirror image to the first. Put the leaves face down (so the stem and leaf are facing each other right side to right side), then sew a straight stitch across.
 If you want, you can add some decorative stitches on the leaves to give them a bit more detail. It didn't take long, and it turned out very cute, I think.
Now, with front and back complete, put them together, right side to right side, and sew all along the edges, leaving only the bottom open.
If you want, you can add some decorative stitches on the leaves to give them a bit more detail. It didn't take long, and it turned out very cute, I think.
Now, with front and back complete, put them together, right side to right side, and sew all along the edges, leaving only the bottom open.

Flip it inside out and stuff it with batting/poly-fil.
 I added a bit of wire, to try to get it to stand up, but it didn't work very well.
 For the bud, make a pattern that is a pointed oval. You'll want to cut out four of these on the color of fleece you need. (Yellow, Blue, and Red Pikmin have white buds; Purple and White Pikmin have pink buds; Rock and Pink Pikmin have purple buds. You can find images easily using a search engine.)
 Sew the pieces together, right side to right side, and you'll get a bud!
 From here, my sewing machine was useless. The fabric was too thick to sew through. A fancier machine might be able to do it, but mine couldn't. I had to sew by hand. So I took a few pieces of green fabric and sewed them around the bottom edges to be the leaves.
Then, complete the stem as above, EXCEPT you leave the top and bottom open. Sew along both sides, then turn the stem inside out. Hand stitch the bud to the top opening, and then stuff with batting.
From here, my sewing machine was useless. The fabric was too thick to sew through. A fancier machine might be able to do it, but mine couldn't. I had to sew by hand. So I took a few pieces of green fabric and sewed them around the bottom edges to be the leaves.
Then, complete the stem as above, EXCEPT you leave the top and bottom open. Sew along both sides, then turn the stem inside out. Hand stitch the bud to the top opening, and then stuff with batting.
And now the most difficult: the flower.
While at Joann buying more fleece, I was talking with the cutting
counter worker. She asked what I was making and I explained, and she
gave me a great idea for making the flowers! Using
Pellon Peltex 2, a double sided, very stiff, adhesive fabric!

So I cut out white half-circles for the petals.

I put five of them in a circle with a yellow middle.

Then I cut out the Peltex and sandwiched it between another layer of
all white. I ironed them together (as the directions say) and then
trimmed off the extra Pletex and bottom layer. For sewing it onto the
stem, I hand stitched five little stitches in the center of flower.
Using this method, It was actually easier than the bud.
Step 3: Attach the Stem
Taking the main hat fabric that we put aside, turn it sideways so the seam we sewed is in the center.
 Flip the hat inside out, keeping the seam in the center. Now, take the stem and turn it sideways, so the seams are in the center. Pinch it flat, so the seams touch.
 Now, place the stem inside the hat, and line up the seams.
 Straight stitch across and trim off the extra fabric.
 Step 4: Adding Embelishments
Rock:
For the Rock Pikmin, I simply stitched on decorative lines, giving it a jagged look.


 Blue:
Blue:
 I just added on a pink triangle on the brim of the hat.
 (And of course, I took the picture before I put on the mouth.)
Red:
(And of course, I took the picture before I put on the mouth.)
Red:
 For the Red, I cut out a pointy nose (front and back) and sewed them together. Stuff with batting.
 Attaching it was pretty easy. I made a horizontal slit in the very front of the hat, right around the brim. With the hat inside out, I stuck the nose into the hat, with the opening on the outside, then sewed it shut (just as we did with the stem).

 Yellow:

Yellow's ears are huge! So, what I did was make a pattern for the ears, again, keeping in mind the size to the hat. In fact, I think the ears are a bit too big.
So, with the pattern, you want to cut out 2 ears, each with a front and a back (4 pieces total). I also added a bit of a darker yellow to the center to give the ears some contrast. You'll only need 2 of those pieces, as they are only on the front.
Sew the darker pieces to the front of the ears--making sure that the ears will be mirror images of each other. Remember, one goes on the right side, one goes on the left. Then, put the front and back together, right side to right side, and sew along both sides, leaving the bottom open.
 With the ears, you need to do it before we stitch the hat together. Put the ears inside the hat, with a bit of the open end sticking out. Then sew up both sides to the V.

 Pink:
Pink:
 For the Pink, I had to add wings. I hand drew a pattern for a circular type wing. Like the ears, you'll need a front and back for each wing--4 pieces total.

Sew them together, leaving the straight edge open for stuffing.
Similar to attaching the Red's nose, I cut two vertical slices on the
back of the hat for the wings. With the hat inside out, stick the
smaller side of the wing through the slit (with the wing
inside the hat) and sew it together. Cut off the extra fabric.

 And here's a few pictures from the actual event. We had a lot of fun!
Here's mine and Pocket's mom in the Yellow hat:
 And I wore the Pink because it was my favorite!

~Buttons