Showing posts with label Crafts. Show all posts

Tuesday, May 24, 2016

Dachshund Wrist Rest

Buttons, here!  Recently, I stumbled across a Pin that showed a cute keyboard wrist rest in the shape of a cat.  I thought it would be a fun project to try, and I also wanted to see if I could shape it like a dachshund instead!  It was the prefect time to make a present for Father's Day (my husband is a wonderful doggie daddy), so I got to work.

Materials:
Fleece (or some other easy to work with fabric)
Sewing machine
Hot glue gun
Stuffing/Padding

First, I cut out brown fleece into a rectangle for the body of the dog.


I didn't really measure, only guesstimated the length of the keyboard.  Next, to make it look like a dachshund, I cut out two rounded back legs.  Our dachshund likes to lay flat on his stomach with his legs poking out like drumsticks.  I wanted to mimic that here.


Again, I just cut.  I have a lot of left over fleece, so I wasn't too concerned with making mistakes.  Plus, the pieces were so tiny, I was cutting from scrap pieces of fleece anyway.  I cut out a long, slightly curved tail.


Using the back feet as a template, I cut out two front feet.


Next, I had to get the shape of the head.  Dachshunds are well-known for their very pointy noses, so I wanted to make sure the snoot was emphasized.  I also cut out ears, thinking it would add more depth to the project.


Using black fleece, I cut out oval eyes and a rounded nose.


 Now for sewing it all together.  First, I turned the body inside out, right side to right side.


Next, I stuck the back legs and tail inside.  This is going to create a pillow type closure, which we will turn inside out, hiding the seams.


Sew it shut.  This can be tricky if you're using fleece.  My sewing machine occasionally has a hard time getting through all the layers.  Just go slow and hand pedal if needed.


After that, sew up the long side.  That will create three closed sides (two sewn, one the natural fold in the fabric).


Now you can turn it inside out and pull the legs and tail straight.
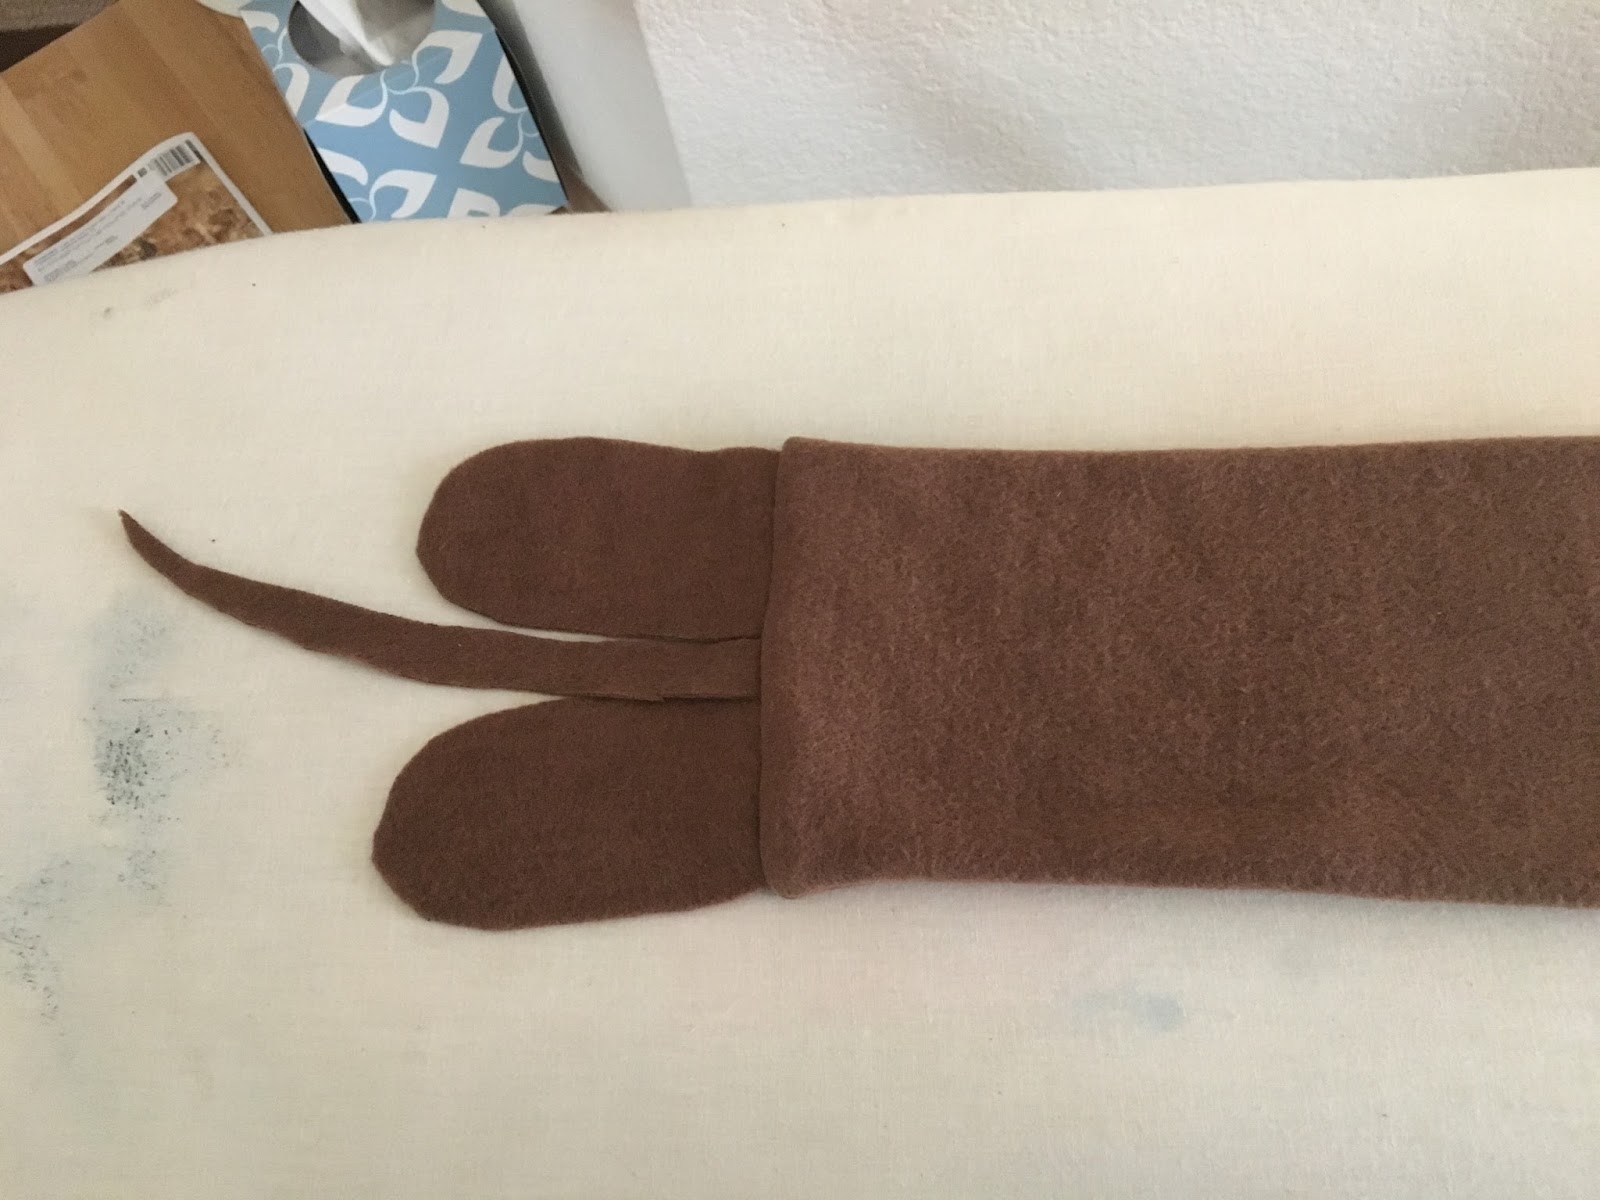

For stuffing, it's personal preference.  Using polyfill would be fine; I also some some tutorials that used rice.  I had some left over padding that seemed the right fit, so I chose this.  It's not as thick as polyfill would have been, and not as heavy as rice.  I think it'll work for my needs.


Cut off any extra fabric.  I was sad to do this since dachshunds are notoriously long.  But my padding piece was too short.  Then, tuck the seam inside the body and stuff the front legs in too.  Sew it shut.  This doesn't need to be a pretty seam since the dog's head will cover most of it.


I didn't really care for the way my dog's head looked.  Plus, I wasn't sure how to assemble the ears onto the face without it looking weird.  So I used my existing head and ears as a template and re-cut the head into one piece.


Using a hot glue gun, I adhered the eyes and nose.  Then I glued the head to the top of the body, covering the seam and a small portion of the legs.

And there you have it!  A cute, super easy wrist rest!  It took me about an hour total of work and prep.


And here's my inspiration!  They're almost the same length!


~Buttons

Sunday, February 28, 2016

Pleated Cherry Skirt

I bought these two printed cotton fabrics at Walmart in the remnant bin ages ago. I liked the way they looked together and I envisioned a cherry skirt!


I started by cutting panels, since I thought it would look cute to alternate between the red and the blue fabrics.


I measured from my waist to about mid-thigh to get the length. For the width, I think I just guesstimated and cut. With a plethora of panels, I wasn't concerned about the width.

I sewed them together (five panels of each color).

And. I. Hated. It.

It's been sitting on my craft table for about six months. Then yesterday, I saw it and thought about finishing it. That was when inspiration struck! Since I hated the way it looked side-by-side, I thought it would a great alternative to turn the red panels into mostly-hidden pleats!


What a prefect idea! I loved the way it looked!

Unfortunalty, my width became a factor when I took away half of it. Because of this, I had to rip my seam and sew in two additional panels (one blue and one red). With this addition, I figured it would be a better idea to just add in a zipper, since the width was nearly exact with my waist.

First, I pinned the pleats in place and sewed along the top seam.


Then I cut a long strip--a little bit longer than my waist measurement.


I folded it in half and sewed it to itself, wrong side to wrong side, to create a wasitband for the top of the skirt.


I sewed it down, beginning in the front and circling to the back left. I stopped an inch from the exact back. Then I repeated on the right, stitching from the front to the back, again, stopping before I got to the end. This was to ensure I had a slit for adding in the zipper.


(This is the back of the strip, neither side being sewn down at the moment)


Adding in the zipper was tricky. I slit an opening down the middle back blue panel. I sewed (very poorly) the zipper into that opening.


Next, I thought it would look cute and fruity to add a green bias tape edge along the bottom hem.


I sewed it down, ironed, and viola!


(This shirt doesn't match very well, and I was having a bad hair day.)

I love the way it turned out! It's super cute!


~Buttons

Wednesday, July 8, 2015

Ombre Panel Skirt

I had some old scraps from a quilt I made--probably five years ago.  I've been wanting to do something with them for awhile, but last month I finally got them out and thought about what to do.

Of course, I decided to make a skirt.  Default Buttons Project.

So, I took my strips.  I had 10 strips that were roughly 42 inches by 5 inches, in various shades of brown, blue, and green.  

C6F68A7C-EE7F-4520-92D4-DDBED65D29E1_zps

The first thing I did was cut them in half.  Then, laying them out on the floor, I decided which pattern to use for sew them together.  I toyed with a random pattern, a logical pattern (blue, green, brown, blue, green, brown, etc.), and an ombre pattern.  After some feedback from Pockets and my husband, I decided to go with ombre.  

Even with the ombre theme decided, there were still a ton of ways to order the fabrics.  It took me many hours of debating to decided on doing lighter strips on either side of a single dark strip in the middle--giving me five panels per color.  The left over panel I used as a band on the bottom.

E73277B2-E532-498C-B1D1-6828CF69EF92_zps

I sewed all the colors together, right side to right side.  Then I added the same color band to the bottom, sewing them right side to right side.

EBC9B384-B0CF-4FD5-8325-A5A05AEB438E_zps
(Here, the dark green is face down atop the other panels; it's kind of hard to tell)

Then, I sewed all three completed panels to each other.  Since there were only three, it didn't matter which order I sewed them in, as they'd all touch each other anyway.

2C2309CB-BDC7-491F-BB93-4FB61D3D61FF_zps

For the bottom hem, I folded the hem up about a half inch and ironed it.  Then folded it up another half inch, and ironed again.  I added pins to be extra safe.

28AD1E22-1272-4542-96F0-66BA617605EB_zps

I sewed the hem twice, giving me a decorative double seam.  It looks very nice.

For the top hem, I folded the edge down about an inch, wide enough for my elastic to fit through, and sewed it closed--except for a few inch gap to string the elastic through.

C4B09363-9745-4B64-AFDA-167D82CD563E_zps

Once the elastic is looped through, finish the seam and you're done!

18942D9B-2FEF-4C36-AB6C-C4368AF2C8B0_zps

I thought about adding pockets, but haven't done it yet.  Without pockets, any of the colors can be in the front, and I like having that choice.  But I may add the pockets anyway.  We'll see.

IMG_4982_zpsegkr7dch.jpg


~Buttons

Sunday, June 7, 2015

Ruffle Shirt

I saw this tutorial on Pineterst and wanted to give it a try.  I'm getting better at making skirts, so I wanted to increase my understanding of how to put shirts together.

Materials:
About 1 yard main fabric
About 1/2 yard contrasting fabric (optional)

First, the directions in the tutorial are spot on.  The way they are set up gives you nice, clean finished seams.  I was really impressed at how wonderful this turned out.  And it was relatively easy.  There were times when I had to read the directions a few times in a row to grasp the concept of what was being said; but that's typical with sewing instructions.

I started with these two fabrics: a mint green knit that I got for $1 a yard at Walmart, and a green and blue paisley cotton that Pockets gave me ages ago.

564A44CF-0771-495F-A07F-F7072A186A22_zps

I cut out all my necessary rectangles:

Four 5 in x 20 inch rectangles in the CONTRAST fabric for the straps (left and right) and the shirt's top band (front and back)
Two 6 in x 12 inch rectangles in the CONTRAST for the pockets (I actually used 5 in x 12 in and it worked just fine)
Two 3 in x 22 inch rectangles in the MAIN fabric for the arm ruffles

Finally, I made a pattern for the shirt's body, a trapezoid 26" on the top and 29" on the bottom.

53B3016F-7706-43B3-A8D9-1118C5D9C998_zps

For the sleeves, you're supposed to add a ruffle.  I tried to do this, but since my knit was too delicate, I couldn't get the ruffle to work.  I really had a hard time sewing the knit fabric in general.  It was too stretchy and thin, so would get sucked into the bottom of my machine.  Several times I had to alter my design to add in a stabilizer to help.  Luckily, the knit looks just fine not-ruffled, so I just left it as it was.

C36AD751-7DD4-4ABC-9F12-01E436BAEB09_zps

For the body, again, I couldn't sew the knits together.  I had to add a thin strip of the contrast fabric underneath to prevent the knit from being pulled in.

21D561CD-85F4-4F39-A75F-17B5B88A4DD6_zps

As it's on the inside, I didn't worry about it--it won't show at all once the piece is done.

118012F0-B351-47A4-957A-921C8FFE6D8F_zps

The directions call for making the pleats before you attach the body to the bands at the top.  Since I have a fuller bust, I wanted to wait to make the pleats, giving me an easier way to make sure the measurements were right.  The original had three pleats on either side, I could only squeeze in two.  

So I pinned the side hems of the body to the side hems of the band.  Then I marked the middle of the front and worked out to the right side, folding the pleats and pinning them.  Then I went back to the middle front and did the left side.  Next, I found the middle back and did the same thing.

40553FAE-A95C-462B-B05F-67788BEE72EA_zps

The pockets were easy to do following the original instructions.  I sewed my about an inch and a half from the side seam on either side of the front.  They look very cute!

One thing I added that was of my own design was a ruffled edge at the bottom.  I took two left over pieces of contrast fabric that were 5 inches by about 40 inches each.  I sewed the short edges together, right side to right side.  Then using the longest stitch, I did a seam 1/2 inch from the top.  Pull on the thread, and this gathers the fabric.  Move the ruffles further away from the edges until the length equals the length of the body.   This was one of the most time consuming parts of the project, but since I couldn't sew the knits together for a nice bottom hem, I figured this would look the nicest.

And here's the finished product!

99AFFBBE-90C3-4B80-9BFD-E9AB9E95748A_zps


As I said, this was pretty easy as far as difficulty goes.  I did it in two days--probably about six hours of work.  Though it's not the most complimentary style for my bust, I love how it flows and has a lot of extra fabric!  It's very comfy.

Tuesday, June 2, 2015

Scalloped Panel Skirt

I wanted to try another panel skirt, and when I was shopping with Pockets, I found an adorable snail print.  The first panel skirt I did was nice, but I wanted this one to be a bit different.  So I played on the snail theme and decided to make this one have scalloped edges.

I drew out a diagram of what I wanted to make--basing it on the same measurements from my original panel skirt. 

0CF83E29-1098-4510-91B7-F22563F7CDE4_zps

For the top layer, I'd use the snail fabric, but I also wanted a plain cotton under skirt.  I chose a green that matched the snails.  And to add a bit more flair, I bought a scalloped ruffle to attach to the bottom of the snail skirt. 

28BE2AE6-631B-4662-A400-9B21A4A41C02_zps

I constructed my pattern out of parchment paper.  

C4DA31E7-838B-4786-ADD1-C09C8F6D11C7_zps

Then I traced it (horizontally) onto my fabric.  This was intentional, giving the snails a side-to-side look rather than a going-up-my-leg look.  

D030BB24-6767-4127-B085-F64C2083662C_zps

After I cut them out, I sewed them together.  

2010E5B4-71A2-4A10-8967-04F8D93E2671_zps

Then, I added the ruffle.  

2014-11-16125307_zpsd7e7a5c9.jpg

2014-11-16125311_zps519aa705.jpg

2014-11-16125314_zpsee8b9000.jpg

Unfortunately, I was about 2-3 inches too short, so I had to cut across the last panel.   

2014-11-16125350_zpse1d3da23.jpg

My green fabric wasn't long enough, so I added white to the top to give it the proper length.  (I used a sheet I had cut up for the Greco/Roman day at school.) 

2014-11-16184200_zpse2e29fcb.jpg

I traced the skirt's general shape, and cut. 

2014-11-16185106_zpsa8fde9ff.jpg

I finished the hem by tucking it under twice and doing a straight stitch.

2014-11-16192350_zps7f6db7aa.jpg

 I looked at the best way to combine them together, and I was drawing a blank.  The problem was that I cut the underskirt straight across instead of making it rounded like the snails.  This gave it an uneven look no matter how I tired to stagger it.  I thought about just cutting off the bottom seam and redoing a curved hem, but sudden inspiration struck me--more on that in a bit.

What I did to get started was sew the elastic band onto the outerskirt.  I just pinned it about two inches from the top at the front, back, left, and right sides.  Then I pulled the elastic and stitched it onto the fabric.  This made an easy elastic hem at the top--unfinished hem, but still easy.  I could have tucked the leftover fabric under, stitched it down and been done.  But, I did want that green underskirt.

After I had the elastic in place, I took the underskirt and pinned it to the top skirt, right side to right side.  This was a mistake.  But it was what made the sudden inspiration happen, so I went with it.

FDE4D65A-3D0D-437D-9DCC-F9073DCD188C_zps

After it was sewn together, I flipped the underskirt inside and sewed it down, about a half an inch under the current elastic hem.

37F4780A-2438-4C42-B49A-93EEA1784DD7_zps

E052B299-CABF-4526-B3F4-48EAF6EAD47F_zps

This is when I realized the underskirt was inside out.  I tried to think about sewing the green fabric up on itself to give me a clean edge.

08B62C41-F500-48B8-914F-F4E208EBFE7A_zps

But then, I thought it would be neat if I could bustle the green fabric.  The length was so off, it had to be lifted or lowered at each panel, so I thought this would be an interesting way to cover up any mistakes in length.

I put it on, and while looking in a mirror to check the length, I pinned the green layer up on itself.

BA3BDDAA-1394-42F9-AFE0-2087783CA887_zps

I sewed it down, going all over the place to get some nice bustles and bunches.

F9DC15E6-BF33-49CA-9F54-FFF6DB2A01BA_zps

And here's the finished product!

FEB66F2A-F8EF-499D-8F1F-81BC69D98FD7_zps

3BD5C89D-7CCF-41E7-9CF3-1C28A4B65C69_zps

CD82F3FA-BCA8-4FD2-9A85-9DADEB09D326_zps

2E3CB552-C89E-40FA-9598-E85109E287FF_zps

I think it turned out pretty cute!  I didn't have a shirt that matched--this neon orange was the closest I could find!  I'll have to find a better one soon.


~Buttons