Friday, July 29, 2016

Mermaid Tail Blanket

I've seen several articles about mermaid tail blankets, yet most of them seem to be sites that sell them, not tutorials on how to construct them.  When I first saw these adorable blankets, I knew I wanted to make one for Pockets.  She loves mermaids!

First, I had to come up with a pattern.  I taped old printed pages together and outlined how I thought it should look.


Once I got it about right, I folded the pattern in half (hot dog) and cut it out.  This ensured that both my side slopes were even.


With the left over pages, I made a pattern for the fins.


Next, it was time to start cutting out my fabrics.  I found this soft, light, jersey knit that reminded me of scales.  I used this for the tail.


For the fins, I used a solid green knit.


With my pattern atop the fabric, I cut it out, making sure it was aligned as straight as possible.


Then, I flipped the pattern upside down and cut out another piece.  This allowed me to get both pieces out of only a yard of fabric.


After that, I assembled my fin patterns atop the green knit.  I cut out two of each fin at the same time.


After they were cut out, I kept them together to ensure that I could make sure they wound up mirroring each other on the final product (more on that in a bit).


I set up the fins where I wanted them to go (about three inches from the bottom).  Now, I had one piece that was the "front" of the blanket, and the other piece that was the "back."  The front and back need to be mirror images of each other since they will be sewn right side to right side.  To ensure that this happened, I took the right fin on the right tail and flipped it to the left fin on the left tail.  That would mean when these two pieces line up on top of each other, they fit perfectly.  (Even thought both fins were traced from the same pattern, I figured there would still be little inconsistencies.)

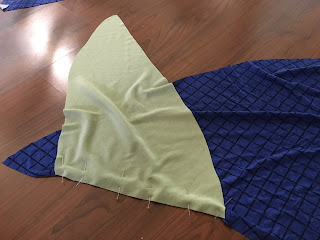
Next, I pinned the fins in place, laying them right side to right side with the tail fabric.


Once all the fins were sewn down, it should look like this.


Next, lay the two pieces together, right side to right side.


Starting at the bottom, sew up the right side, around the fin to the top.  Repeat on the left side.  Leave the top open.


To finish the top seam, I used a thin, black bias tape.


And since I had the pattern, I made another one!  The second was flannel.


~Buttons

Fleece Pokeball

Like most of the world, I've been enjoying playing Pokemon Go since its release a few weeks ago.  I've had a deep, deep love for Pokemon ever since the first games became available.  I must have been twelve or thirteen when I got my copy of Pokemon Red--and my life has never been the same.

Desperate for a Pokemon craft, I realized that assembly a fleece Pokeball would probably be pretty simple.  There are other ways to craft Pokeballs--from styrafoam to tiny ping pong balls--but I always use fleece by default.  It's such an easy material to work with.

So, for my first attempt (and I know there will be several more) I stuck with the average Pokeball.  That is, the red and white one.

First, I cut out a pattern of a rounded triangle, 3 inches long and 3 inches high.  (I realize now that I could have mirrored the pattern for an elongated oval and cut my sewing in half; next time.)


I cut this pattern out four times on the red fleece and four times on the white fleece.


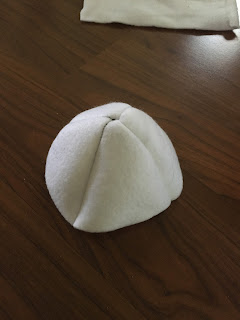
Next, I sewed the white pieces together, right side to right side, to form a dome.


Then I repeated the same thing for the red triangles.


Putting them together, right side to right side, I stitched up their seams, leaving an inch opening.


Turn it inside out.


Stuff with Polyfill.


Hand stitch the opening.  Don't worry if it's not pretty; it'll be covered by the black band around the middle.


Next, I cut out a strip of black fleece that was a bit longer than the circumference of the Pokeball.


With a hot glue gun, I glued down one side of the black strip to the center of the Pokeball.


I glued the strip down all the way around, trimming the end for a nice finish.  Again, don't worry if it's not the prettiest because it will be covered up with the round button.


Cut out a round piece of black fleece and glue it on top of the strip.


Next, cut out a smaller white circle and glue it atop the black circle.


Not the nicest job (I got a bit crazy with the glue) but it works!  Of course, since it's cute and plushy, my doggie thinks it's for him.


~Buttons