Monday, June 6, 2016

Arrietty's Pin

The last thing I needed for my Arrietty costume was the pin she "borrows" from the kitchen.  While I saw an amazing tutorial on how to do this with a wooden dowel and a Styrofoam sphere, I didn't have any of those items on hand.  I did the only logical thing: try to make it out of fleece.

HA!  This turned out to be a mistake, but I'll still share the steps, because it turned out pretty cute, and it would be a great idea if you needed a prop for a child.

First, I cut out a rectangle of gray fleece and folded it in half.


Next, I stitched from the top to the bottom, going in at an angle.


I trimmed off the excess fabric and flipped it inside out.


Next, I added a taped hanger to try and give it a structural element to keep its shape.


Then I stuffed it with polyfill.


My dog loved the polyfill.


Naturally, I had to manipulate this photo....


Moving on.  With the metal part of the pin done, I moved onto the plastic yellow ball.  I cut out eight pointed ovals.


I sewed them all together using my sewing machine.  I left the last stitch an inch undone.


Turning it inside out, I then stuffed it with polyfill.


I hand stitched it onto the top of the pin.


And it wound up looking something like this:


Pretty cute, but totally impractical.  It had no structure, despite the hanger inside.  It was way too floppy.  

So, I bought a dowel and a Styrofoam ball and did as the tutorial instructed.  

I painted the dowel white.  Then painted it gray/silver.  I also added a Mod Podge top layer to seal it.


For the ball, I added a Mod Podge base, a few coats, to try and fill in the holes.  It didn't quite work.  I would have spent more time on it, but my deadline was quickly approaching.


I painted it white.  Then yellow.  Then added another top layer of Mod Podge.

And I wound up with this:


The original tutorial said to sand the edge into a pencil-like point.  I didn't have the tools for this, so I left it as is.  This made it just a tad too long.  But, it worked just fine!

And the whole thing together:


~Buttons

Wednesday, June 1, 2016

Arrietty's Bag

With my Arrietty dress finished, I had to move onto making her other accessories.  First was her bag.


It has an adorable, across the chest style.  True to my lazy fashion, I chose to work with fleece because it's easy and you don't need to worry about finishing seams.

First I cut out a pattern from parchment paper.  I measured the distance from my shoulder to my hip for the length (and added two inches).  I made sure my parchment paper was that long.

Next, I decided how wide I wanted it to be.  I picked half the length, giving me a 24 inch by 12 inch rectangle.  I tapered the side to give it that elongated look, then mirrored the cut on the three other sides. 


I traced this onto white fleece for the back/bottom of the bag.


Next, for the top/front, I wanted two pieces that overlapped.  This is the way Arrietty opens her bag in the film.  So I folded the pattern down to the top of the side flap and traced it onto white fleece.


I cut out two of these.

I also cut out a long strip of green fleece, the length from my shoulder, down my chest, to my hip.

Next, layering.  Place the bottom piece FACE UP.  Next, lay down the green strip for the handle, aligning both of the ends with the tapered ends of the bag.  The green strap will be completely inside the bag.  (I'm sorry I didn't take pictures of this step!)

Then, place down the top flap that will be facing out.  It's RIGHT SIDE needs to be facing down, laying atop the bottom piece and the green strap.

Finally, lay down the second inside flap.  None of its seams will be seen, so it doesn't matter how the edges look.

Sew completely around the bag.  At the tapered edges, you will be sewing through FOUR layers (bottom, strap, top one, top two).  My machine did this without problem.  Usually it gets picky when I send fleece through it, but it gave me no trouble this time.

Once it's all sewn, flip it inside out and it's perfect!  All the seams are nice and neat and pretty!

Now all you have to do is sew on the button.

Arrietty's bag has a big, red button.  I bought one at Hobby Lobby for about $3.  I sewed it on the bottom of the top layers, then sliced a buttonhole on the top of the bottom layers.


And now pair it with the dress and you have this:


I may need to add in something to flatten the bag.  We'll see.


~Buttons

Arrietty Dress

I'm not sure if I was bit by the crafting bug, or what!  But I have been sewing every day for the past week.  And I love it!  It's been a long time since I've felt this motivated.  Maybe it's the Phoenix Comicon coming up.  I wanted to have this outfit ready for then!

As I said earlier, I was so excited to try making an Arrietty dress.  With the success of my turtleneck, and the ease with which I produced it, I was super anxious to go out and buy some red knit fabric and jump right in!

Only problem was that apparently knits are expensive at retail stores!  I've only ever bought it at fabric warehouses ($3-$4 a yard), and that bit I bought at Goodwill ($2.50 for 2 yards).  Looking at Joann Fabrics, the prices were very steep!  I found the perfect color, the perfect fabric, the perfect feel: $12.99 a yard!  Or, a sorta right color, with a sorta right fabric, and a sorta right feel: $5.99 a yard.  ARGH!  The dilemmas of a crafter!

Ultimately, I went with the more expensive fabric.  I wanted to make sure it looked good!  And the way the jersey felt was divine!  I'd make all my clothes from this if I could.  I absolutely love it!

I bought two yards just to be safe.


If you remember my turtleneck:


I based the dress off that same template.  I used the same tank top, and then pinned a skirt to it at the length I liked.


A note about fabric directions.  Each fabric has a natural stretch.  For knits, it's usually very pronounced.  One way stretches while the other is more unyielding.  Well, I forgot this as I was working on this project.  Mostly because I had to tinker with the best way to get the dress cut out in one piece.  That meant flipping the fabric sideways.  I was SO, SO lucky that this fabric is multi-directional stretchy.  I didn't even know that existed!  It has a lot more stretch going left to right.  But there was some going up and down, which saved this outfit!  If it didn't have the stretch, I never would have been able to get it over my head!  (Well, I could have added in a zipper, but it would have taken a lot more time and effort.)

I cut out the pattern, starting at the skirt, along the sides, the armpit, the sleeve, and then instead of following the plunging neckline, I just cut straight up.


Next, I traced this on the fabric again to get the back.

So hard to see, but the dress front is folded on top.
With both pieces cut out, I pinned them together along the sides, right side to right side.


I sewed up both sides.  Then I sewed from the top of the sleeve to the top of the high neck.


Next, I used the same trick of implementing an existing pattern for the sleeves.


I cut out two.


Then folded them in half and sewed the long side down.


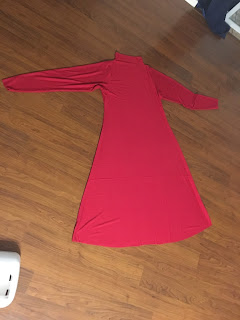
To attach the sleeves, remember that you want your fabrics RIGHT SIDE to RIGHT SIDE.  Turn your dress inside out and place the sleeves inside, pinning them in place.  Sew all around.  And you've got this:


It's way too long, I'll have to trim it!  But I'm done for now!

~Buttons

Make a Turtleneck

I've had a project in mind ever since I rewatched Miyazaki's wonderful film "The Secret World of Arrietty" (based on the novel "The Borrowers" by Mary Norton).

The Arrietty soundtrack cover

Arrietty wears an adorable red dress.  It has long sleeves and a high neckline.  This is the outfit she wears to "borrow" things from the human's house.

I wanted that outfit so bad!

So, while at Goodwill this past weekend, I spied about two yards of this jersey knit fabric.  I bought it for $2.50!


I thought it would be the perfect fabric to attempt to make a turtleneck in preparation for an Arrietty cosplay dress.

I don't have a pattern for a turtleneck, so I was unsure of where to start.  I had to force my hesitance aside and just DO IT!  I have this terrible fear of wasting fabric, of making outfits I never wear.  Suppress this if you have it.  The only way to learn and improve is to make those mistakes.  I worked up my courage and drew up a small sketch of what I thought was the best way to approach this.

My breakthrough idea was using an existing shirt as a template.

I don't own turtlenecks.  I'm not sure why.  I had to improvise.  I grabbed a tank top and started with that.


Let me add a quick note about fabric direction.  Most fabrics have a natural stretch to them; this is especially true with knits.  Always make sure your stretch goes left to right.  This is what enabled me to get my head inside the turtleneck without adding a zipper.  This also helps the fabric hug your curves and look more flattering.

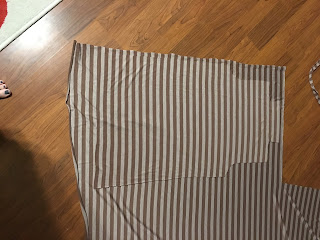
So, I folded my fabric in just enough to fit the tank top.  From there, I cut along the bottom, side, armpit, and sleeve, leaving about an inch for seam allowance.  At the top, instead of following the dipping neckline, I just went straight up.  When unfolded, I got this:


I now used this as my pattern and traced in on the fabric to get the back.

Sorta hard to see the two layers atop each other.

I cut it out.  Next, I sewed the two pieces together.  First along the sides, from the bottom of the shirt to the bottom of the arm.  Next, I sewed from the top of the arm to the top of the neck.  Like so:


This left my arm holes completely open.


Now for the sleeves.... I cheated on this.  I used an existing pattering I already had.  Luckily it fit perfectly!  If you don't have a pattern you can borrow, look at this tutorial for making sleeves.


I cut out two sleeves.  Fold the sleeve in half, then sew along the long side.


Attaching sleeves used to intimidate me.  Not anymore.  The trick is just remembering you want your fabrics RIGHT SIDE to RIGHT SIDE.  So, turn your shirt inside out.  Keep your sleeves right side out (like normal, the seams on the inside).  Put your sleeve inside your shirt and align the sewn edge of the sleeve with the side seam of the shirt.  Pin it all the way around.


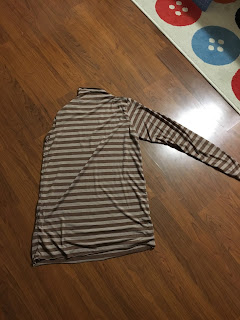
Sew it all down.  Flip it out, and you get this:


Repeat on the other sleeve.


And you're done.  Well, I was done.  You'd still technically need to hem the bottom, hem the sleeves, and hem the neckline.  Since this was practice--and I'm super lazy--I left it as it was.  That's one of the wonderful things about knits, you don't need to finish seams!


Can you tell I have soot sprites on my phone case?

~Buttons