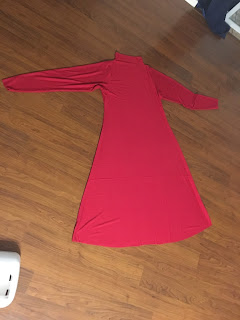
As I said earlier, I was so excited to try making an Arrietty dress. With the success of my turtleneck, and the ease with which I produced it, I was super anxious to go out and buy some red knit fabric and jump right in!
Only problem was that apparently knits are expensive at retail stores! I've only ever bought it at fabric warehouses ($3-$4 a yard), and that bit I bought at Goodwill ($2.50 for 2 yards). Looking at Joann Fabrics, the prices were very steep! I found the perfect color, the perfect fabric, the perfect feel: $12.99 a yard! Or, a sorta right color, with a sorta right fabric, and a sorta right feel: $5.99 a yard. ARGH! The dilemmas of a crafter!
Ultimately, I went with the more expensive fabric. I wanted to make sure it looked good! And the way the jersey felt was divine! I'd make all my clothes from this if I could. I absolutely love it!
I bought two yards just to be safe.
If you remember my turtleneck:
I based the dress off that same template. I used the same tank top, and then pinned a skirt to it at the length I liked.
A note about fabric directions. Each fabric has a natural stretch. For knits, it's usually very pronounced. One way stretches while the other is more unyielding. Well, I forgot this as I was working on this project. Mostly because I had to tinker with the best way to get the dress cut out in one piece. That meant flipping the fabric sideways. I was SO, SO lucky that this fabric is multi-directional stretchy. I didn't even know that existed! It has a lot more stretch going left to right. But there was some going up and down, which saved this outfit! If it didn't have the stretch, I never would have been able to get it over my head! (Well, I could have added in a zipper, but it would have taken a lot more time and effort.)
I cut out the pattern, starting at the skirt, along the sides, the armpit, the sleeve, and then instead of following the plunging neckline, I just cut straight up.
Next, I traced this on the fabric again to get the back.
 |
| So hard to see, but the dress front is folded on top. |
I sewed up both sides. Then I sewed from the top of the sleeve to the top of the high neck.
Next, I used the same trick of implementing an existing pattern for the sleeves.
I cut out two.
Then folded them in half and sewed the long side down.
To attach the sleeves, remember that you want your fabrics RIGHT SIDE to RIGHT SIDE. Turn your dress inside out and place the sleeves inside, pinning them in place. Sew all around. And you've got this:
It's way too long, I'll have to trim it! But I'm done for now!
~Buttons


No comments:
Post a Comment