 |
| The Arrietty soundtrack cover |
Arrietty wears an adorable red dress. It has long sleeves and a high neckline. This is the outfit she wears to "borrow" things from the human's house.
I wanted that outfit so bad!
So, while at Goodwill this past weekend, I spied about two yards of this jersey knit fabric. I bought it for $2.50!
I thought it would be the perfect fabric to attempt to make a turtleneck in preparation for an Arrietty cosplay dress.
I don't have a pattern for a turtleneck, so I was unsure of where to start. I had to force my hesitance aside and just DO IT! I have this terrible fear of wasting fabric, of making outfits I never wear. Suppress this if you have it. The only way to learn and improve is to make those mistakes. I worked up my courage and drew up a small sketch of what I thought was the best way to approach this.
My breakthrough idea was using an existing shirt as a template.
I don't own turtlenecks. I'm not sure why. I had to improvise. I grabbed a tank top and started with that.
Let me add a quick note about fabric direction. Most fabrics have a natural stretch to them; this is especially true with knits. Always make sure your stretch goes left to right. This is what enabled me to get my head inside the turtleneck without adding a zipper. This also helps the fabric hug your curves and look more flattering.
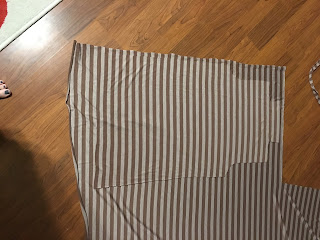
So, I folded my fabric in just enough to fit the tank top. From there, I cut along the bottom, side, armpit, and sleeve, leaving about an inch for seam allowance. At the top, instead of following the dipping neckline, I just went straight up. When unfolded, I got this:
I now used this as my pattern and traced in on the fabric to get the back.
 |
| Sorta hard to see the two layers atop each other. |
I cut it out. Next, I sewed the two pieces together. First along the sides, from the bottom of the shirt to the bottom of the arm. Next, I sewed from the top of the arm to the top of the neck. Like so:
This left my arm holes completely open.
Now for the sleeves.... I cheated on this. I used an existing pattering I already had. Luckily it fit perfectly! If you don't have a pattern you can borrow, look at this tutorial for making sleeves.
I cut out two sleeves. Fold the sleeve in half, then sew along the long side.
Attaching sleeves used to intimidate me. Not anymore. The trick is just remembering you want your fabrics RIGHT SIDE to RIGHT SIDE. So, turn your shirt inside out. Keep your sleeves right side out (like normal, the seams on the inside). Put your sleeve inside your shirt and align the sewn edge of the sleeve with the side seam of the shirt. Pin it all the way around.
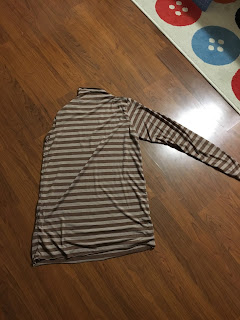
Sew it all down. Flip it out, and you get this:
Repeat on the other sleeve.
And you're done. Well, I was done. You'd still technically need to hem the bottom, hem the sleeves, and hem the neckline. Since this was practice--and I'm super lazy--I left it as it was. That's one of the wonderful things about knits, you don't need to finish seams!
 |
| Can you tell I have soot sprites on my phone case? |
~Buttons


No comments:
Post a Comment