
Hello! Buttons, here. Pockets posted her tutorial on how to make an Aes Sedai shawl, so I thought I'd post mine as well since we did a few steps differently. First off, a list of materials:
About 2 yards of main material
About 2 yards of a liner/backing material
About 3 yards of fringe
White fabric scraps for the Flame
Sewing machine
Thread
Pins
Step 1: Choose a fabric
This one is actually a lot more difficult than you'd think. It took me weeks and weeks to find the perfect shawl fabric (and I didn't even wind up using that one!). The original I bought was a silky white, with a leaf/flower print on it.

But, when I was tasked with making a shawl for a friend, Mish, I set out to find the perfect material for her. While doing so, I ran across a beautiful outdoor upholstery fabric. At first, all I could find was an olive green, which wasn't too bad.

But, then I went shopping with Pockets and we found the same pattern, but in a deeper green. We loved it so much, I bought the same pattern in white, and Pockets got it in yellow!


And of course, the fabric choice is completely up to you! When talking with Maria Simons--Robert Jordan's assistant--she said that a shawl is completely up to the Aes Sedai. The only thing they require is the Flame on the back, and the fringe be in the Ajah color. So, you could have a red fabric with white fringe and that would be fine for the White Ajah. Naturally, in the books, there was so much distrust between the Ajahs, so most wore shawls in their Ajah color too. It makes it a lot easier to identify, but it's not necessary.
Once you've chosen your fabric, you need your measurements. What Pockets and I did was measure our wingspan (from palm to palm). We wanted our shawls to be at least that length at the top. Our measurement was about 60 inches. Here's where it gets tricky. When you buy fabrics, they come in different widths, usually 42-45 inches or 60 inches. Decorative cotton fabrics are in the 42-45 inch range, while fleece and other specialty fabrics can come in the 60 inch range. The fabric we decided on was around 60 inches. That meant, we only had to buy 1 1/2 yards instead of 2 yards. BUT if we had a 45 inch fabric, that 45 width would be from our neck to our butt, so we would need the length to be 60 (but it's recommended to round up to 72--better to have too much than too little).
Here's an illustration to help show the difference between the 45 inch and the 60 inch fabric (obviously not to scale):

To recap:
If you are using a 42-45 inch fabric, you'll need 2 yards of material
If you are using a 60 inch fabric, you'll need 1 1/2 yards of material
Step 2: Cutting your fabric
As I said before, we wanted our top length to be our wingspan. But what about the length from the shoulders down? To get that, we looked at examples of shawls in cannon, mainly, the New Spring graphic novel. In it, Siuan and Moiraine receive their Blue Ajah shawls. Here's what it looks like:
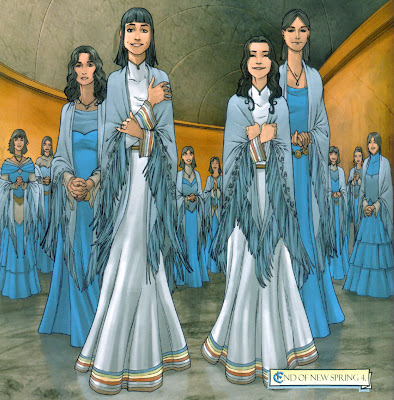
You can see here, the back of the shawl is nearly down to the middle of their calf! Well, we didn't want it quite that long. So we just measured from the base of the neck to the thigh. This came out to be about 38 inches. If you're taller than me (because I'm very short), or if you want it longer, just increase the measurement from the shoulders.
Here's how you would measure it on the fabric (again, not to scale):

For getting the angles, you can use math. But, to make it easier, I just measured my top (60 inches) and marked it halfway (30 inches). From there, draw up to each corner. Super simple!

Depending on which type of fabric you're using, you might need to use Fray Check. If the fabric's strands will come loose, it's definitely recommended to use Fray Check. It's like a glue that will hold all the loose pieces together. But, some fabrics won't fray, so this step isn't necessary. OR, if you're going to sew the pieces together using the sandwich method (right side to right side, then flip it inside out), you can also skip this step. I didn't want to lose that inch when using the sandwich method, so I chose to use Fray Check.
It's very simple. Just put a small amount of Fray Check over the lines you drew for the sides. Unfortunately, I used pen (don't use pen!), so the ink bled into my white fabric!

It looks dark, but it dries nearly clear. Apply Fray Check to both angles sides. You can also use Fray Check on the top, but I folded it inside, so I got a nice, straight edge (more on this later).
Now, you'll have nice, even triangles!


Step 3: Fringe
In the New Spring image, the fringe is pretty long. I really, really love the long fringe, however, it's difficult to find in-store. Pockets and I talked to many people at JordanCon about their shawls, and one place recommended was an online store called Crazy Crow Trading Post. They have beautiful 18 inch fringe! But, it's difficult to match a fabric color to a picture online. So, we looked and looked until we found something usable at the fabric stores.
For Mish's green shawl, I found the most gorgeous fringe! It was multicolored green, and shaped like tassels! I bought all the store had, and it was barely enough to finish the shawl! (It was probably about 8-10 inches long)


The lighting is my house is so bad! It's hard to tell how wonderfully the colors compliment each other.
For my shawl, I was lucky enough to find about 5 inch fringe at the same store.

For finding out how much fringe you need, we can measure both angle sides and add together. When Pockets and I were shopping, we didn't have our fabrics with us, so I had to use math. Basically, a shawl is like two right angle triangles put together. Because of this, we can use the handy-dandy Pythagorean theorem! For those of you who don't remember that (and shame on you), it's:

With a being half our top length, and b being our shoulder to thigh measurement, and c being our diagonal. :D Here's an illustration to help (I hope):

Or, in simpler terms, you square your a and b lengths, add them together, then take the square root. Then you need to add that number twice; once for each diagonal side we have.
So, for mine, I would need roughly 2.7 yards of fringe. I bought 4, I think, and just used the left overs to overlap at the bottom.
Step 4: the Flame
Adding on the Flame is an essential step to any Aes Sedai shawl. It is what makes it an Aes Sedai shawl. You also have a few choices about how big you want it to be, what fabric you want to use, do you want it fancy or plain... This is a great way to customize your shawl and make it your own.
For Mish's, I used a scrap of my shawl fabric as her Flame. This turned out really cool, because I was able to line it up, and keep the pattern continuous. For my shawl, since it was already white, I needed a material that would stand out enough. I used a white silk.
First, you need to cut out the pattern. I just printed one from online.

Cut it out, and trace it on your fabric. For Mish's this was a bit more complex because I had to get it lined up properly:


I also applied Fray Check to the Flame.
Pin it on.


And sew!

I started at the point because that was the trickiest part. But you're welcome to do it the way that's more comfortable for you.
And here we have it:


Step 5: Backing fabric
This step is technically optional. Since most people will never see the back, if it's not nice and neat, that's not a problem. But there are some advantages to having a backing fabric. If you use a cotton, or a non-slip fabric, the shawl will sit nicer on your shoulders.
I decided to use a back because I did want the nice, neat finish. For Mish's shawl, I used a white linen. For mine, I (stupidly) used a white silk (same as my flame).
What you do is lay down your shawl and pin it to the backing fabric (wrong side to wrong side). Trace, or just cut out, the backing material.


Because the sides won't be sewn under, you'll have to use Fray Check again if the material will fray. I did on both mine and Mish's.
Trim it right to the edge because it will be your final seam.
Step 6: Adding the fringe and backing
This is when it all comes together. Lay your shawl material (the one with the Flame) face down on the floor. Take your fringe and find the halfway point. To do this, just fold it in half and mark the center with your finger. Cut the fringe in half at that line.
With one of the halves, start at one edge of your shawl. I started at the top, that way, the extra fringe could be added to the bottom. Lay it down flat on the shawl and pin.

You can see here that the fringe is almost long enough to go down and up again. But this way, the extra fringe will be down at the bottom where it will be more visible.

Once the fringe is pinned in place, put the backing fabric FACE-UP on top. Pin all three layers together.

Now, we sew it. We only want to do the two fringed sides right now. We'll have to do something different for the top. (Also, if you're interested in trying the sandwich method, please look at Pockets' post here.)
For Mish's shawl, I had a green fabric on the bottom and a white on the top. Because of this, I used a green thread in my bobbin, and a clear thread on top. My machine's tension was a bit funky that day, so some of the green did come through, but not enough to ruin it.

Also when sewing, I used a lattice stitch. I thought this would help hold on the strands of the fringe. It looks like this:


Though it's hard to see, this is the lattice stitch.
So now we have this:

Step 7: Sewing the top.
This is the last step! We could cut off the excess fabric and use Fray Check and sew them together, but I thought it would have a cleaner look if we folded the fabric under. So I took both layers (the shawl and the backing) and folded them inside of the shawl. Then pin.


Sew over it with a straight stitch, and you are DONE!
Oh wait, one last step. See those gross edges on the bottom of the fringe? We need to pull those off. It's very easy. Just take a few strands and pull gently. Seriously, if you take more than five it's very difficult to pull free.

Also, some of the strands might be uneven. Hold the shawl horizontal and cut off any that are longer.

And now you are DONE! :D


See how simple that was?
~Buttons
No comments:
Post a Comment